먼저 FileZilla를 설치하고 가비아도 결제를 진행했다
FileZilla는 내 컴퓨터에서 리눅스 컴퓨터로 파일을 넘겨줄때 사용하고
가비아는 도메인 사용에 사용된다
# 버킷리스트 만들기

from flask import Flask, render_template, request, jsonify
app = Flask(__name__)

@app.route('/')
def home():
	return render_template('index.html')

@app.route("/bucket", methods=["POST"])
def bucket_post():
	sample_receive = request.form['sample_give']
    print(sample_receive)
    return jsonify({'msg': 'POST(기록) 연결 완료!'})

@app.route("/bucket/done", methods=["POST"])
def bucket_done():
    sample_receive = request.form['sample_give']
    print(sample_receive)
    return jsonify({'msg': 'POST(완료) 연결 완료!'})

@app.route("/bucket", methods=["GET"])
def bucket_get():
    return jsonify({'msg': 'GET 연결 완료!'})

if __name__ == '__main__':
	app.run('0.0.0.0', port=5000, debug=True)
<!DOCTYPE html>
<html lang="en">
<head>
    <meta charset="UTF-8">
    <meta http-equiv="X-UA-Compatible" content="IE=edge">
    <meta name="viewport" content="width=device-width, initial-scale=1.0">

    <link href="https://cdn.jsdelivr.net/npm/bootstrap@5.0.2/dist/css/bootstrap.min.css" rel="stylesheet"
    	integrity="sha384-EVSTQN3/azprG1Anm3QDgpJLIm9Nao0Yz1ztcQTwFspd3yD65VohhpuuCOmLASjC" crossorigin="anonymous">
    <script src="https://ajax.googleapis.com/ajax/libs/jquery/3.5.1/jquery.min.js"></script>
    <script src="https://cdn.jsdelivr.net/npm/bootstrap@5.0.2/dist/js/bootstrap.bundle.min.js"
        integrity="sha384-MrcW6ZMFYlzcLA8Nl+NtUVF0sA7MsXsP1UyJoMp4YLEuNSfAP+JcXn/tWtIaxVXM"
        crossorigin="anonymous"></script>

    <link href="https://fonts.googleapis.com/css2?family=Gowun+Dodum&display=swap" rel="stylesheet">

    <title>인생 버킷리스트</title>

    <style>
        * {
        	font-family: 'Gowun Dodum', sans-serif;
        }

        .mypic {
            width: 100%;
            height: 200px;

            background-image: linear-gradient(0deg, rgba(0, 0, 0, 0.5), rgba(0, 0, 0, 0.5)), url('https://images.unsplash.com/')
            background-position: center;
            background-size: cover;

            color: white;

            display: flex;
            flex-direction: column;
            align-items: center;
            justify-content: center;
        }

        .mypic > h1 {
        	font-size: 30px;
        }

        .mybox {
            width: 95%;
            max-width: 700px;
            padding: 20px;
            box-shadow: 0px 0px 10px 0px lightblue;
            margin: 20px auto;
        }

        .mybucket {
            display: flex;
            flex-direction: row;
            align-items: center;
            justify-content: space-between;
        }

        .mybucket > input {
        	width: 70%;
        }

        .mybox > li {
            display: flex;
            flex-direction: row;
            align-items: center;
            justify-content: center;

            margin-bottom: 10px;
            min-height: 48px;
        }

        .mybox > li > h2 {
            max-width: 75%;
            font-size: 20px;
            font-weight: 500;
            margin-right: auto;
            margin-bottom: 0px;
        }

        .mybox > li > h2.done {
        	text-decoration:line-through
        }
    </style>
    <script>
        $(document).ready(function () {
        	show_bucket();
        });

        function show_bucket(){
            $.ajax({
                type: "GET",
                url: "/bucket",
                data: {},
                success: function (response) {
                	alert(response["msg"])
                }
            });
        }

        function save_bucket(){
            $.ajax({
                type: "POST",
                url: "/bucket",
                data: {sameple_give:'데이터전송'},
                success: function (response) {
                	alert(response["msg"])
                }
            });
        }

        function done_bucket(num){
            $.ajax({
            type: "POST",
            url: "/bucket/done",
            data: {sameple_give:'데이터전송'},
            success: function (response) {
            	alert(response["msg"])
            }
        });
    }
    </script>
</head>
	<body>
        <div class="mypic">
            <h1>나의 버킷리스트</h1>
        </div>
        <div class="mybox">
            <div class="mybucket">
                <input id="bucket" class="form-control" type="text" placeholder="이루고 싶은 것을 입력하세요">
                <button onclick="save_bucket()" type="button" class="btn btn-outline-primary">기록하기</button>
            </div>
        </div>
        <div class="mybox" id="bucket-list">
            <li>
            	<h2>✅ 호주에서 스카이다이빙 하기</h2>
            	<button onclick="done_bucket(5)" type="button" class="btn btn-outline-primary">완료!</button>
            </li>
            <li>
            	<h2 class="done">✅ 호주에서 스카이다이빙 하기</h2>
            </li>
            <li>
            	<h2>✅ 호주에서 스카이다이빙 하기</h2>
            	<button type="button" class="btn btn-outline-primary">완료!</button>
            </li>
        </div>
    </body>
</html>


MongoDB Cloud
MongoDB Cloud is a unified data platform for modern applications and includes a global cloud database, search, data lake, mobile, and application services.
www.mongodb.com
# post 방식 (기록하기)


@app.route("/bucket", methods=["POST"])
def bucket_post():
    sample_receive = request.form['sample_give']
    print(sample_receive)
    return jsonify({'msg': 'POST(기록) 연결 완료!'})

function save_bucket(){
    $.ajax({
        type: "POST",
        url: "/bucket",
        data: {sameple_give:'데이터전송'},
        success: function (response) {
        	alert(response["msg"])
        }
    });
}

<button onclick="save_bucket()" type="button" class="btn btn-outline-primary">기록하기</button>


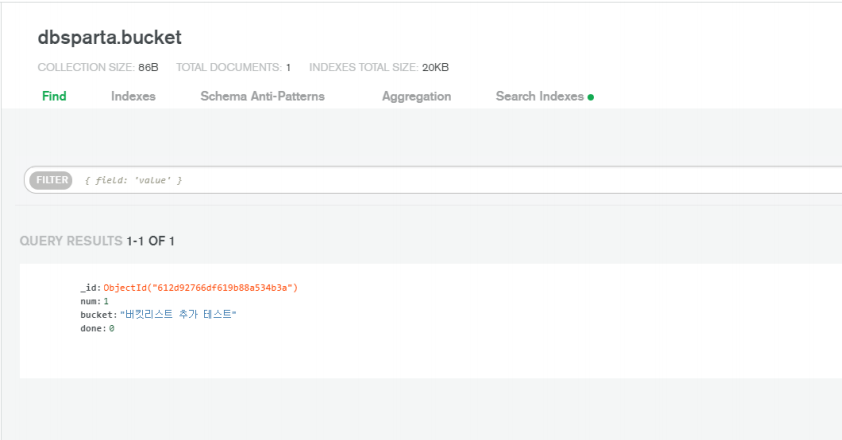
count = list(db.bucket.find({},{'_id':False}))
num = len(count) + 1

vs

count = db.bucket.find({},{'_id':False}).count()
num = count + 1
@app.route("/bucket", methods=["POST"])
def bucket_post():
    bucket_receive = request.form["bucket_give"]

    count = db.bucket.find({},{'_id':False}).count()
    num = count + 1

    doc = {
        'num':num,
        'bucket': bucket_receive,
        'done':0
    }

    db.bucket.insert_one(doc)
    return jsonify({'msg':'등록 완료!'})


function save_bucket(){
    let bucket = $('#bucket').val()
    $.ajax({
        type: "POST",
        url: "/bucket",
        data: {bucket_give:bucket},
        success: function (response) {
            alert(response["msg"])
            window.location.reload()
        }
    });
}


# get 방식 (보여주기)


@app.route("/bucket", methods=["GET"])
def bucket_get():
	return jsonify({'msg': 'GET 연결 완료!'})

$(document).ready(function () {
    show_bucket();
});

function show_bucket(){
    $.ajax({
        type: "GET",
        url: "/bucket",
        data: {},
        success: function (response) {
            alert(response["msg"])
        }
    });
}


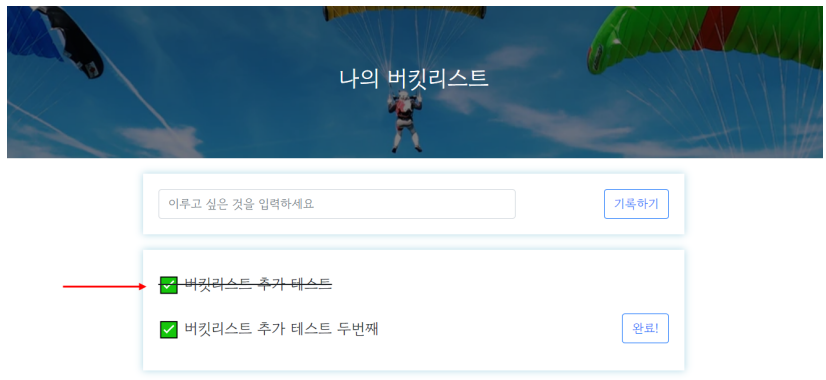
@app.route("/bucket", methods=["GET"])
def bucket_get():
    buckets_list = list(db.bucket.find({},{'_id':False}))
    return jsonify({'buckets':buckets_list})


function show_bucket(){
    $('#bucket-list').empty()
    $.ajax({
        type: "GET",
        url: "/bucket",
        data: {},
        success: function (response) {
            let rows = response['buckets']
            for (let i = 0; i < rows.length; i++) {
                let bucket = rows[i]['bucket']
                let num = rows[i]['num']
                let done = rows[i]['done']

                let temp_html = ``
                if (done == 0) {
                    temp_html = `<li>
                                <h2>✅ ${bucket}</h2>
                                <button onclick="done_bucket(${num})" type="button" class="btn btn-outline-primary">완료!</
                                </li>`
                } else {
                    temp_html = `<li>
                                <h2 class="done">✅ ${bucket}</h2>
                                </li>`
                }
                $('#bucket-list').append(temp_html)
            }
        }
    });
}


# post (완료하기)


@app.route("/bucket/done", methods=["POST"])
def bucket_done():
    sample_receive = request.form['sample_give']
    print(sample_receive)
    return jsonify({'msg': 'POST(완료) 연결 완료!'})

function done_bucket(num){
    $.ajax({
        type: "POST",
        url: "/bucket/done",
        data: {sameple_give:'데이터전송'},
        success: function (response) {
        	alert(response["msg"])
        }
    });
}

<button onclick="done_bucket(5)" type="button" class="btn btn-outline-primary">완료!</button>


@app.route("/bucket/done", methods=["POST"])
def bucket_done():
    num_receive = request.form["num_give"]
    db.bucket.update_one({'num': int(num_receive)}, {'$set': {'done': 1}})
    return jsonify({'msg': '버킷 완료!'})


function done_bucket(num){
    $.ajax({
        type: "POST",
        url: "/bucket/done",
        data: {'num_give':num},
        success: function (response) {
            alert(response["msg"])
            window.location.reload()
        }
    });
}


# AWS 리눅스 서버 구매하기

# AWS 리눅스 서버 실행방법


sudo chmod 400 받은키페어를끌어다놓기

ssh -i 받은키페어를끌어다놓기 ubuntu@AWS에적힌내아이피

ssh -i /c/Users/vuddu/Desktop/vuddus526_mykey.pem ubuntu@43.200.172.227


ssh -i 받은키페어를끌어다놓기 ubuntu@AWS에적힌내아이피

ssh -i /c/Users/vuddu/Desktop/vuddus526_mykey.pem ubuntu@43.200.172.227
# 리눅스 명령어 (주로쓰이는 것 위주로 간단하게 정리)


ls: 내 위치의 모든 파일을 보여준다.

pwd: 내 위치(폴더의 경로)를 알려준다.

mkdir: 내 위치 아래에 폴더를 하나 만든다.

cd [갈 곳]: 나를 [갈 곳] 폴더로 이동시킨다.

cd .. : 나를 상위 폴더로 이동시킨다.

cp -r [복사할 것] [붙여넣기 할 것]: 복사 붙여넣기

rm -rf [지울 것]: 지우기

sudo [실행 할 명령어]: 명령어를 관리자 권한으로 실행한다.

sudo su: 관리가 권한으로 들어간다. (나올때는 exit으로 나옴)
# 리눅스 설정하기


# python3 -> python
sudo update-alternatives --install /usr/bin/python python /usr/bin/python3 10
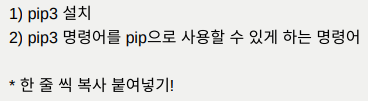
# pip3 -> pip
sudo apt-get update
sudo apt-get install -y python3-pip
sudo update-alternatives --install /usr/bin/pip pip /usr/bin/pip3 1
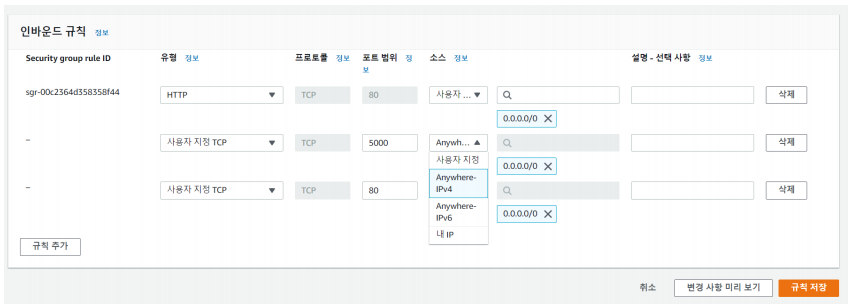
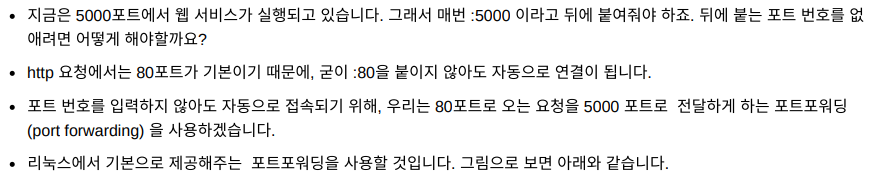
# port forwarding
sudo iptables -t nat -A PREROUTING -i eth0 -p tcp --dport 80 -j REDIRECT --to-port 5000


# 배포하기 위한 FileZilla 이용방법


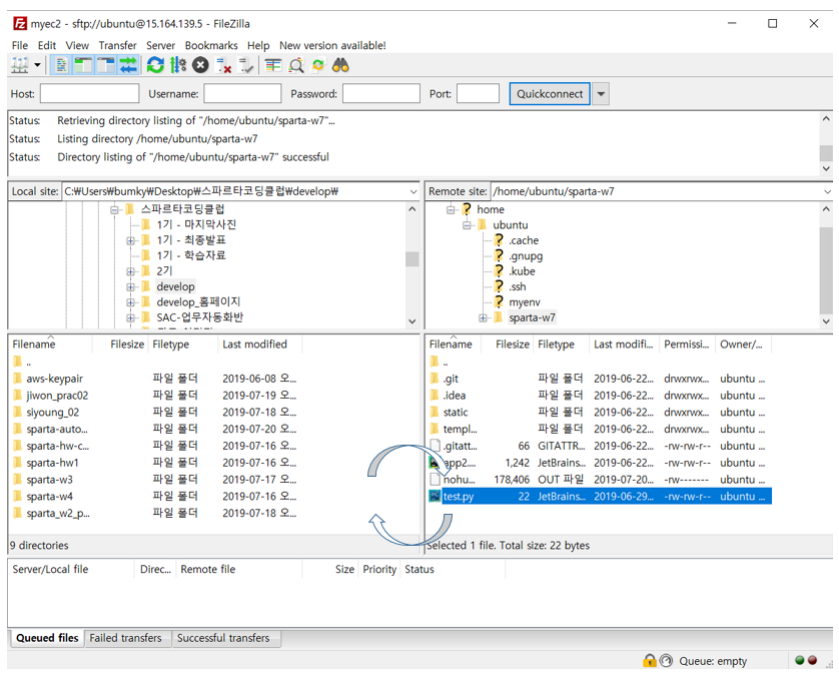

python test.py
FileZilla를 켜서 아래의 파일을 리눅스 컴퓨터로 옮겨준다
static, templates, app.py
그 다음 nohup으로 켜주면된다
# 리눅스에서 Flask 서버 실행하기


python app.py


pip install flask

pip install pymongo dnspython


python app.py

크롬 브라우저 창에 아래와 같이 입력합니다.
http://[내 EC2 IP]:5000/


# 리눅스 git bash 꺼도 계속 켜지도록 nohup 설정하기


// 아래의 명령어로 실행하면 된다
nohup python app.py &

ps -ef | grep 'python app.py' | awk '{print $2}' | xargs kill

http://내AWS아이피/
# 계속 켜지도록 nohup 처리된거 강제로 끄기
ps -ef | grep 'python app.py' | awk '{print $2}' | xargs kill해당코드는 작업을 다시 해야하거나 할때 강제로 끄고
작업을 마무리하고 다시 올리고 nohup하면 된다
즉 잘돌아가던거 git bash에 강제끄기로 끄고
파일 바꿔치고
다시 돌리고
이 순서로 하면된다
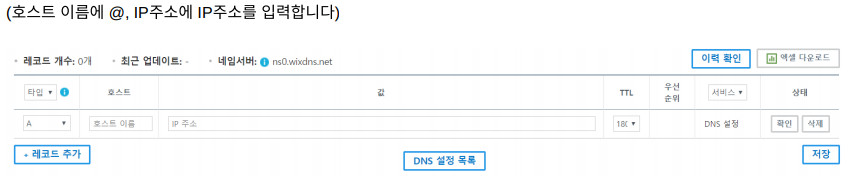
# 가비아 통해 도메인 연결하기


웹을 넘어 클라우드로. 가비아
dns.gabia.com

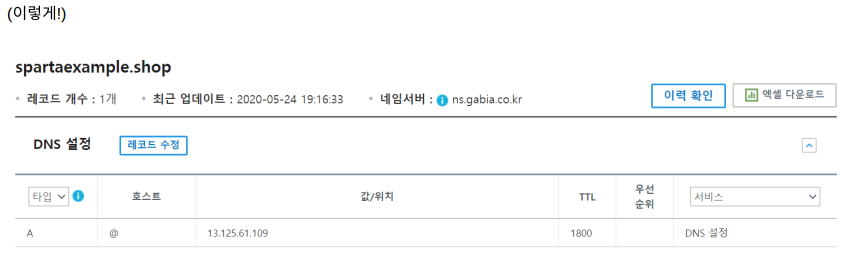


http://내AWS아이피/

http://내도메인/
# OG 태그 만들기


<meta property="og:title" content="내 사이트의 제목" />
<meta property="og:description" content="보고 있는 페이지의 내용 요약" />
<meta property="og:image" content="이미지URL" />


https://developers.facebook.com/tools/debug/
공유 디버거 - Facebook for Developers
공유 디버거를 사용하면 Facebook에 공유될 때 콘텐츠가 표시되는 모습을 미리 보거나 오픈 그래프 태그를 사용하여 문제를 디버깅할 수 있습니다. 이 도구를 사용하려면 Facebook에 로그인하세요.
developers.facebook.com

https://developers.kakao.com/tool/clear/og
카카오계정 로그인
여기를 눌러 링크를 확인하세요.
accounts.kakao.com
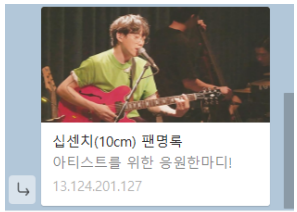
# 최종 결과물 링크
펭귄이 만든 오마이걸 팬명록
응원 한마디 남기고 가세요!
vuddus526.shop
응원 한마디씩 남겨주세요 ㅎㅎ
# 느낀점
AWS, 리눅스, 가비아, FileZilla 등 많은 새로운것을 배우는 시간이였고
혼자하려면 어려웠을 문제를 간단하게 배우고 실제 배포까지 해보는
시간을 가질 수 있어서 너무 좋았다
5주간 배우는 과정이지만 나는 5일 정도만에 끝냈다
파이썬이라던지 파이참 IDE를 사용한다던지 이런건 다 처음이지만
전체적인 웹이 어떻게 만들어지는 흐름을 알고 있었기에
한번더 리마인딩하며 새로운 기술을 익히는 좋은 시간이였던거 같다
앞으로 남은 시간동안은 자바, 자바스크립트, 파이썬 강의를 들으며 정리를하며
cs, 알고리즘, 노션, 깃 활용관련 공부를 할 생각이다
그리고 사전과정 스터디 조 가 짜여졌기에 스터디에서 진행하는 토이프로젝트도
동시에 진행할듯하다
본과정에 들어가기에 앞서 많은것을 정리하고 본과정에서 프로젝트에 집중 할 수 있도록 노력할 것이다
화이팅 해보자!
'항해99 개발일지' 카테고리의 다른 글
| [항해99] 자바스크립트 문법 뽀개기 (내용정리) (0) | 2022.08.15 |
|---|---|
| [항해99] 파이썬 문법 뽀개기 (내용정리) (0) | 2022.08.14 |
| [항해99] 웹개발 종합반 4주차 (내용정리) (0) | 2022.08.13 |
| [항해99] 웹개발 종합반 3주차 (내용정리) (0) | 2022.08.13 |
| [항해99] 웹개발 종합반 2주차 (내용정리) (0) | 2022.08.13 |