[CS] JUnit을 이용한 Unit Test
테스트 코드를 작성하는 방법을 간략하게 적어보고자 한다
TDD가 무엇이고 단위테스트가 무엇인지는 아래 링크로 정리해 두었다
https://vuddus526.tistory.com/294
[CS] TDD (Test-Driven Development)
1. TDD (Test-Driven Development) 란? 테스트 코드를 먼저 만들고, 실제 프로덕션 코드를 나중에 만드는 개발 방법을 말한다 여기서 테스트 코드란 무엇일까 제품이 예상하는(원하는) 대로 동작하는지 확
vuddus526.tistory.com
1. JUnit 이란?
- 자바 프로그래밍 언어용 단위 테스트 프레임워크 이다
- 어노테이션을 기반을 테스트를 지원한다
- 단정문(Assert)를 통해서 테스트 케이스의 기대값에 대해 수행 결과를 화인할 수 있다
- Junit5는 크게 Jupiter, Platform, Vintage 모듈로 구성되어있다
Junit Jupiter
- TestEngine API 구현체
- JUnit5를 구현하고 있다
Junit Platform
- test를 실행하기 위한 뼈대이다
- 각종 IDE를 연동을 보조하는 역할을 한다
Junit Vintage
- TestEngine 구현체 JUnit 3, 4를 구현하고 있다
- JUnit 3,4 버전으로 작성된 테스트 코드를 실행할 때 사용된다

2. JUnit 사용설정
스프링 부트 환경에서는 build.gradle을 확인해보면
이미 JUnit 사용을 위한 환경설정이 되어있다

3. 테스트 파일 생성하기
1) 만들고자하는 클래스에서 control + shift + T 를 누른다

2) create new test를 누르면 해당 화면처럼 나온다
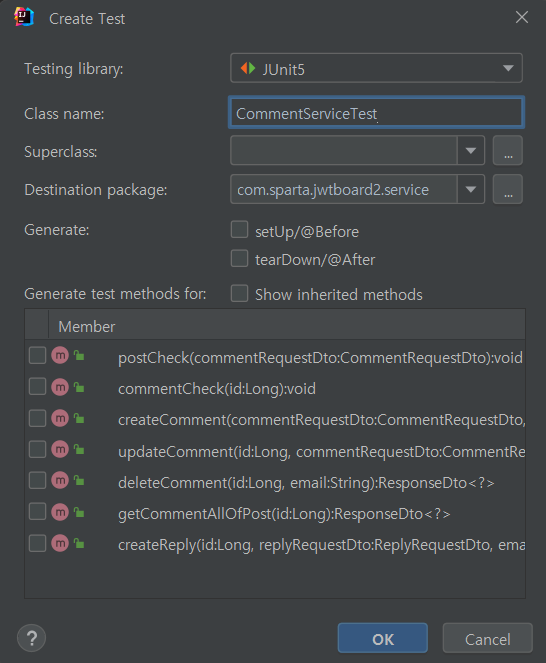
3) 아래에서 테스트하고자하는 메서드를 선택해서 OK를 누르면
아래와같이 자동으로 만들어진다

4. JUnit 어노테이션 알아보기
Junit LifeCycle 어노테이션
| Annotation | Description |
| @Test | 테스트용 메소드를 표현하는 어노테이션 |
| @BeforEach | 각 테스트 메소드가 시작되기 전에, 실행되어야 하는 메소들 표현 |
| @AfterEach | 각 테스트 메소드가 시작된 후 실행되어야 하는 메소드르 표현 |
| @BeforeAll | 테스트 시작 전에 실행되어야 하는 메소드를 표현(Static 처리 필요) |
| @AfterAll | 테스트 종료 후에 실행되어야 하는 메소드를 표현(Static 처리 필요) |
Junit Main Annotation
@SpringBootTest
- 통합 테스트 용도로 사용된다
- @SpringBootApplication을 찾아가 하위의 모든 Bean을 스캔하여 로드한다
- 그 후 Test용 Application Context를 만들어 Bean을 추가하고 MockBean을 찾아 교체한다
@ExtendWith
- JUnit4에서 @RunWith로 사용되던 어노테이션이 ExtendWith로 변경된다
- @ExtendWith는 메인으로 실행될 Class를 지정할 수 있다
- @SpringBootTest는 기본적으로 @ExtendWith가 추가되어 있다
@WebMvcTest(Class명.class)
- ( )안에 작성된 클래스만 실제로 로드하여 테스트를 진행한다
- 매게변수를 지정해주지 않으면 @Controller, @RestController, @RestControllerAdvice 등
컨트롤러와 연관된 Bean이 모두 로드된다
- 스프링의 모든 Bean을 로드하는 @SpringBootTest대신 컨트롤러 관련 코드만 테스트할 경우 사용한다
@Autowired
- Controller의 API를 테스트하는 용도인 MockMvc 객체를 주입 받는다
- Perform()메소드를 활용하여 컨트롤러의 동작을 확인할 수있다
- andExpect(), andDo(), andReturn() 등의 메소드를 같이 활용한다
@MockBean
- 테스트할 클래스에서 주입 받고 있는 객체에 대해 가짜 객체를 생성해주는 어노테이션이다
- 해당 객체는 실제 행위를 하지 않는다
- given() 메소드를 활용하여 가짜 객체의 동작에 대해 정의하여 사용할 수 있다
@AutoConfigureMockMvc
- spring.test.mockmvc의 설정을 로드하면서 MockMvc의 의존성을 자동으로 주입한다
- MockMvc 클래스는 REST API 테스트를 할 수 있는 클래스이다
@Import
- 필요한 Class들을 Configuration으로 만들어 사용할 수 있다
- Configuration Component 클래스도 의존성 설정할 수 있다
- Import된 클래스는 주입으로 사용 가능하다
5. JUnit 사용해보기
1) Junit LifeCycle 확인해보기

package com.sparta.jwtboard2.test;

import org.junit.jupiter.api.AfterAll;
import org.junit.jupiter.api.AfterEach;
import org.junit.jupiter.api.BeforeAll;
import org.junit.jupiter.api.BeforeEach;
import org.junit.jupiter.api.Disabled;
import org.junit.jupiter.api.DisplayName;
import org.junit.jupiter.api.Test;

public class LifeCycleTest {
   @BeforeAll
   static void beforeAll() {
      System.out.println("## BeforeAll Annotation 호출 ##");
      System.out.println();
   }

   @AfterAll
   static void afterAll() {
      System.out.println("## afterAll Annotation 호출 ##");
      System.out.println();
   }

   @BeforeEach
   void beforeEach() {
      System.out.println("## beforeEach Annotation 호출 ##");
      System.out.println();
   }

   @AfterEach
   void afterEach() {
      System.out.println("## afterEach Annotation 호출 ##");
      System.out.println();
   }

   @Test
   @DisplayName("Test Case 1")
   void test1() {
      System.out.println("## test1 시작 ##");
      System.out.println();
   }

   @Test
   @DisplayName("Test Case 2")
   void test2() {
      System.out.println("## test2 시작 ##");
      System.out.println();
   }

   @Test
   @Disabled // Disabled Annotation : 테스트를 실행하지 않게 설정하는 어노테이션
   void test3() {
      System.out.println("## test3 시작 ##");
      System.out.println();
   }
}
위와 같이 테스트 해보면 아래와 같이 출력된다

BeforeAll 이 제일 먼저 실행되고
beforeEach가 각 메서드가 실행되기 전 실행
afterEach가 각 메서드 실행 후 호출
@Disabled를 만나면 함수 호출 X
2) 객체 생성 테스트
먼저 User라는 객체에 email을 기본값으로 vvv@vvv.com으로 넣어두고
assertEquals로 aaa@aaa.com을 넣었을때를 비교해보았다

package com.sparta.jwtboard2.test;

import static org.junit.jupiter.api.Assertions.*;

import org.junit.jupiter.api.DisplayName;
import org.junit.jupiter.api.Test;

import com.sparta.jwtboard2.entity.User;

public class UserTest {
   @Test
   @DisplayName("User 생성 테스트")
   void CreateUser() {
      System.out.println("## Create User 시작 ##");
      System.out.println();

      User user = new User("펭귄", "1234");

      assertEquals(user.getName(), "펭귄");
      assertEquals(user.getEmail(), "aaa@aaa.com");
   }
}
그 결과 아래와 같이 name은 에러없지만
이메일은 다르다는 문구가 나온다
이걸로 알 수있는 것은 User 객체에 아무값도 넣지 않았을때 Default값이 잘 들어가는지
User객체에 값을 넣었을때 잘 들어갔는지 Assert 함수를 사용해 테스트 할 수 있다

6. Assert 메서드
assertEquals(a, b)
- a와 b의 값이 동일한지 확인
assertSame(a, b)
- a와 b의 객체가 동일한지 확인
assertNull(a)
- a가 null인지 확인
assertNotNull(a)
- a가 null이 아닌지 확인
assertTrue(a)
- a가 true인지 확인
assertFalse(a)
- a가 false인지 확인
assertThrows(Exception에러 종류 a, 발생하는 로직 b)
- b 로직시에 a Exception이 발생하는지 확인
assertThat
- AssertJ 라이브러리에 포함된 메서드, 어떤 조건이 참인지 확인
7. JUnit 유효성 테스트해보기
Validation 테스트 코드를 작성해보겠다
그전에 한가지 어노테이션을 보자면
@Nested 어노테이션은 @Test를 그룹으로 묶어 마치 클래스처럼 사용할수 있게 만드는 어노테이션이다
(계층구조의 테스트 코드를 작성할 수 있도록 해준다)
1) 유효성 검사 클래스를 만든다
package com.sparta.jwtboard2.test;

import org.springframework.stereotype.Component;

@Component
public class UserValidator {
   public static void validateUserInput(Long userId, String name) {
      if (userId == null || userId <= 0) {
         System.out.println(userId);
         throw new IllegalArgumentException("회원 id가 유효하지 않습니다");
      }

      if (name == null) {
         System.out.println(name);
         throw new IllegalArgumentException("회원 이름을 작성해 주세요");
      }
   }
}
2) 도메인 User에 유효성검사 메서드를 넣어둔다
public User(Long id, String name) {
    UserValidator.validateUserInput(id, name);
    this.id = id;
    this.name = name;
}
3) Test
package com.sparta.jwtboard2.test;

import static org.junit.jupiter.api.Assertions.*;
import org.junit.jupiter.api.BeforeEach;
import org.junit.jupiter.api.DisplayName;
import org.junit.jupiter.api.Nested;
import org.junit.jupiter.api.Test;

import com.sparta.jwtboard2.entity.User;

public class UserTest2 {

   @Nested
   @DisplayName("유저 객체 생성")
   class CreateUser {
      private Long userId;
      private String name;
      private User user;

      @BeforeEach
      void setup() {
         user = new User(1L,"펭귄");
      }

      @Nested
      @DisplayName("실패 케이스")
      class FailCases {
         @Nested
         @DisplayName("회원 이름")
         class userName {
            @Test
            @DisplayName("null 일때 '회원 이름을 작성해 주세요'")
            void fail() {
               // given
               name = null;
               // when
               Exception exception = assertThrows(IllegalArgumentException.class, () -> {
                  new User(1L, name);
               });
               // then
               assertEquals("회원 이름을 작성해 주세요", exception.getMessage());
            }
         }
      }
   }

}